

How To Use My Garden Pump Sprayer With Paint
Painting With an Airless Sprayer
It's the best way to complete big paint jobs fast or apply a glass-smooth finish
 Family Handyman
Learn how to use an airless paint sprayer to paint faster with perfectly smooth results. We show you how the machine works, good painting techniques and how to avoid mistakes.
You might also like: TBD
Airless paint sprayers: Pros and Cons
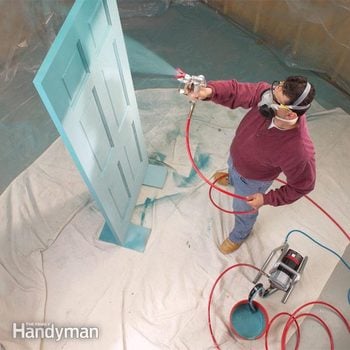
An airless sprayer, or a spray paint machine, simplifies painting in two ways: First, if you want to speed up a job that requires several gallons of paint, you can apply it twice as fast as with a roller or brush. And second, if you want a glass-smooth finish on woodwork or doors, the airless sprayer can lay the paint on flawlessly.
An airless sprayer works by pumping paint at a very high pressure, up to 3,000 psi, through a hose and out a tiny hole in the spray gun tip. The tip is designed to break up the paint evenly into a fan-shaped spray pattern of tiny droplets. Using different tips, you can spray thin liquids like stain, lacquer and varnish or thicker liquids like latex house paint. With a little practice, you can use an airless sprayer to apply a perfectly smooth finish on doors, cabinets and woodwork. And since an airless sprayer pumps paint directly from a can or 5-gallon bucket, you can apply a lot of material in a short time. This makes an airless sprayer particularly well suited for large paint jobs, like priming bare drywall in a new house or painting a 300-ft.-long privacy fence.
But before you get too excited about the benefits of spray painting, there are a few drawbacks to consider. First, the fine particles of paint don't all stick to the surface. A large percentage of the paint ends up in the air, where it can drift and settle onto everything in sight. This means you'll be wasting 20 to 40 percent of the finish, depending on the application. You'll also have to take extra time to mask off and cover up everything you want to keep paint free. Outdoor painting is especially risky. Overspray can end up on your shrubs or roof, or drift with the wind onto your neighbor's car.
The other downside is the extra time it takes to flush the paint from the pump and hose and clean up the spray gun. If you're using your own sprayer or an electric paint sprayer, rather than a rental unit, you'll also have to clean the filters and install special storage fluid. And if you're spraying oil-based products, you'll have to store or recycle a gallon or two of used solvents left over from the cleaning process. But despite these disadvantages, an airless can save you a lot of time on big paint jobs and allow you to get a finish that's nearly impossible to get with a brush.
Airless Sprayers: Rent or Buy a Spray Paint Machine?
Airless sprayers start at about $200. Spending more doesn't necessarily get you more features, but it does get you a bigger, better motor and pump, which will deliver longer life and trouble-free operation. Owning a sprayer allows you to spray whenever you want and to ensure that the sprayer is clean and well maintained.
Renting is a good option if you don't expect to use the sprayer very often and want to avoid the extra maintenance. You can rent an airless sprayer for about $75 per day. Make sure the hose and pump are clean and that the filters have been cleaned or replaced. Ask for help in choosing the right spray tip for the job. Some rental stores won't allow you to spray oil-based products like lacquer, oil stain or oil paint, so be sure to ask.
Sprayer set-up: Prime the pump
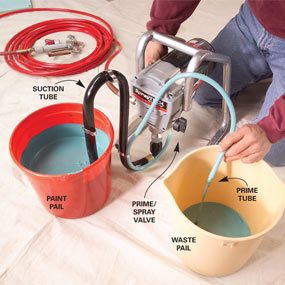
Photo 1: Prime the pump
Place the smaller prime tube in a waste pail and the suction tube in the bucket of strained paint. Turn the prime/spray valve to "prime." Switch on the pump. Turn the pressure valve up until the pump starts. When the paint starts flowing from the prime tube, move it into the paint bucket.
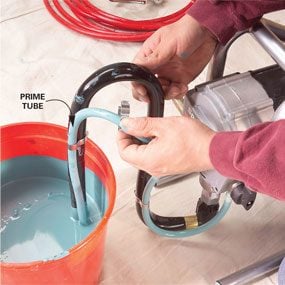
Photo 2: Clear air bubbles
Clip the prime tube to the suction tube. Let the pump run for about 30 seconds or until no more air bubbles come out of the tube.
Whether you rent or buy an airless sprayer, there are a few key setup points. All sprayers have a screen at the intake point. Make sure it's clean. Most sprayers also have a removable filter near the pump and another one in the handle of the airless spray gun. Check both to make sure they're clean, and plan to strain your paint through a mesh filter bag to remove lumps so they won't clog the filters.
Before you can start spraying, you have to prime the pump. Photos 1 and 2 show how. You may have to repeat this process if the paint in the bucket runs out while you're spraying.
Sprayer set-up: Fill the hose and gun
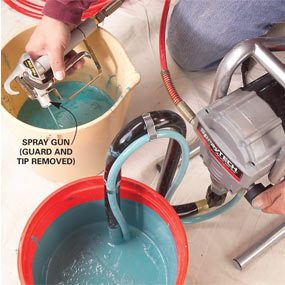
Photo 3: Fill the hose
Hold the airless paint sprayer gun (guard and spray tip removed) over the waste bucket and pull the trigger. Switch the valve to the "spray" setting. Let go of the trigger when paint is flowing in a steady stream from the gun. Lock the trigger and follow the "Pressure Relief Steps."

Photo 4: Install the tip
Screw the guard assembly loosely onto the gun and align the guard at a 90-degree angle to your desired spray pattern. Insert the spray tip until the tab is engaged.
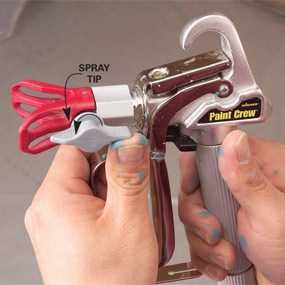
Photo 4A: Align and tighten the tip
Rotate the tip to face the arrow forward. Snug the guard assembly hand-tight.
Once the pump is primed, you're ready to fill the hose with paint (Photo 3). Then lock the trigger and relieve the pressure before installing the tip guard assembly and inserting the tip (Photo 4 and 4A).
Pressure relief steps
- Turn off the power switch.
- Turn the spray/prime valve to prime.
- Aim the gun against the side of the waste pail and pull the trigger to release the pressure.
- Engage the trigger lock.
Choose the Best Tip for the Job
Spray tips slide into a hole in the front of the airless paint sprayer gun. They're labeled with a three-digit number like 309 or 517 (these may be the last three digits of a longer model number). Doubling the first digit tells you the spray fan width with the gun held 12 in. from the surface. A 415 tip, for example, would have an 8-in.-wide fan, while a 515 would have a 10-in. fan pattern.
The next two digits indicate the size of the hole in thousandths of an inch. Choose a smaller diameter hole (.009 to .013) for thin liquids like stain or varnish and a larger hole (.015 or .017) for thicker liquids like latex paint.
A 411 tip would work well for spraying varnish on woodwork, while a 517 is a good size for spraying large surfaces with latex paint.
Sprayer set-up: Adjust the pressure

Photo 5: Adjust the pressure
Turn on the pump and move the prime/spray lever to the "spray" position. Spray a strip of paint across a piece of cardboard to check the spray pattern. If the spray pattern has tails, the pressure is set too low. Turn up the pressure.

Photo 5A: Retest the pattern
Retest and adjust until the paint is evenly distributed across the fan pattern
Too little pressure will result in an uneven spray pattern. And too much pressure causes excessive overspray and premature tip wear. Photo 5 shows how to dial in just the right amount. If you're still getting "tails" or an uneven spray pattern even at maximum pressure, try using a tip with a smaller hole. If the spray pattern is round rather than narrow, the tip is worn and should be replaced.
Spray techniques

Photo 6: Spraying technique Step 1
Squeeze the trigger before you reach the edge of the door. Move the sprayer quickly across the door, keeping it parallel to the surface. Release the trigger when the sprayer is past the opposite edge of the door.

Photo 7: Spraying technique Step 2
Overlap about half of the previously painted strip when you make the next pass with the sprayer. Keep the gun perpendicular to the surface.
Photos 6 and 7 show the correct spray techniques. Here are a few key points:
- Plan your spraying sequence before you start. On doors, for example, spray the edges first. Then spray top to bottom. Then spray at right angles side to side.
- Squeeze the trigger while the gun is off to the side, and then move it onto the work (Photo 6).
- Move the gun parallel to the surface, not in an arc.
- Keep the gun perpendicular to the surface, not tilted (Photo 7).
- Move fast to prevent runs. Several thin coats are better than one thick one.
- Overlap your strokes about 30 to 50 percent.
Troubleshooting

Photo 8: Clear a clogged tip
If paint stops flowing or sputters from the gun, the tip may be clogged. Twist the tip 180 degrees. Point the gun at a scrap of paper and squeeze the trigger to clear the clog. Rotate the tip 180 degrees to point it forward again and spray a test strip onto the scrap.
Most spray problems are a result of clogged filters, a clogged tip (Photo 8), or a pump that's either leaking at the packing or has stuck ball-check valves. Careful cleaning and proper maintenance will prevent most of these troubles.
Other problems, such as runs and uneven coverage, are caused by using the wrong tip size or by a lack of spraying experience. As with most construction tasks, practice is the key to success.
Airless Sprayer Safety
Read and follow the safety precautions included in your sprayer manual. If you rent a sprayer, ask for a list of precautions.
Here are the most important ones:
- Keep the trigger locked and follow the pressure relief procedure when you stop spraying, before cleaning, and before servicing the sprayer or installing tips. Never put your hand in front of the sprayer tip unless the unit is off and depressurized. The high-pressure spray can inject paint under your skin, causing a serious poisoning hazard. If you do puncture your skin with the spray, get to a doctor immediately.
- Wear safety glasses and an approved respirator when you're spraying.
- Work in a well-ventilated area.
Caution: When you're spraying flammable oil-based products, follow all grounding precautions to prevent sparks. Read your manual or ask the rental store for instructions on grounding the gun and metal pail.
Similar Projects
How To Use My Garden Pump Sprayer With Paint
Source: https://www.familyhandyman.com/project/painting-with-an-airless-sprayer/
Posted by: davisdorbacted.blogspot.com
0 Response to "How To Use My Garden Pump Sprayer With Paint"
Post a Comment